Why I Needed Sequential Updates
I maintain 20‑plus ESPHome nodes on a small ARM‑based Home Assistant server. Each OTA update forces a full C++ compile, which can take ≈ 5 min per device. Two compiles at once, however, balloon the total wall‑time (CPU contention + I/O) and can push the server to its limits.
I opened esphome/feature‑requests #2171 asking for a shared build‑cache across devices—because most of my YAML files differ only in pin mappings. If the cache wasn’t per device, maybe I could have kicked off all devices at once, or even used esphomes own “update all” as it had its own issues with not being able to run for hours and hours. Until that feature lands, the workaround has been to update devices strictly one after another.
Initially I handled that in Node‑RED with a JavaScript function node. As Home Assistant’s script syntax supports loops, variables and conditional waits, I migrated everything to a HA‑native script. Below you’ll learn exactly how it works and why it’s much easier to maintain.
TL;DR – We gather every
update.xxx_firmwareentity that has an ESPHome update available, then loop through them withupdate.install, letting Home Assistant block until each flash is done. All progress is pushed to a persistent notification so you can follow along.
The Building Blocks
Home Assistant scripts have picked up several Jinja‑powered features over the last two years:
| Block | What it does |
|---|---|
variables: | Define scoped values you can reuse later in the script. |
repeat: | Iterate over a list & expose repeat.index / repeat.item. |
choose: | Classic if / else logic. |
wait_template: | Pause until a condition becomes true (so we can prevent two updates from running concurrently). |
We’ll lean on variables + repeat to accomplish our sequential workflow.
Picking the Devices
The first step is to build a list of only those firmware entities that (a) belong to ESPHome and (b) actually have an update pending:
- variables:
    esphome_updates: >
      {{ states.update
         | selectattr('attributes.title', 'equalto', 'ESPHome')
         | selectattr('state',          'equalto', 'on')
         | map(attribute='entity_id')
         | list }}
The states.update gives you every update.* entity. Two chained selectattr() filters it down to only ESPHome devices that have updates, and map() grabs the entity IDs. We store the result in esphome_updates for use throughout the script.
If that list ends up empty we bail out early with a “Nothing to do” notification—no sense spamming the log.
Waiting for Ongoing Flashes
Before kicking off a batch I also make sure no other ESPHome update is already running—handy if you sometimes flash a single node ad‑hoc from the ESPHome UI.
- wait_template: >
    {{ states.update
       | selectattr('attributes.title', 'equalto', 'ESPHome')
       | selectattr('attributes.in_progress', 'equalto', true)
       | list | length == 0 }}
That tiny block protects you from overlapping runs. We could have used the mode: queued, but that doesn’t handle if the script was started, stopped and then started again.
The Loop
Once we’re clear, we iterate one entity at a time. Inside the loop we set an easy‑to‑read variable and fire the installer:
- repeat:
for_each: "{{ esphome_updates }}"
sequence:
- variables:
this_entity: "{{ repeat.item }}"
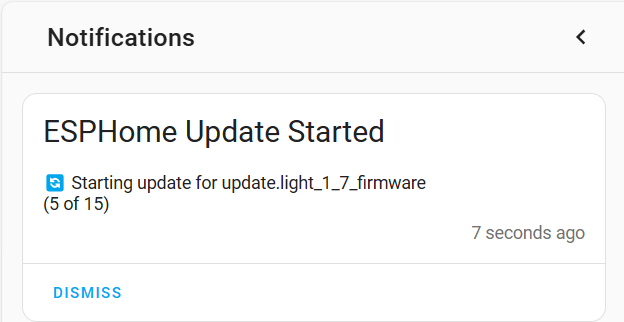
- service: persistent_notification.create
data:
title: "ESPHome Update Started"
message: >
🔄 Starting update for {{ this_entity }}
({{ repeat.index }} of {{ esphome_updates | count }})
notification_id: update_esphome_notification
- service: update.install
data:
entity_id: "{{ this_entity }}"
- service: persistent_notification.create
data:
title: "ESPHome Update Completed"
message: "✅ Finished updating {{ this_entity }}"
notification_id: update_esphome_notification
Highlights
repeat.indexis 1‑based, perfect for quick X of Y status lines.update.installnow blocks until the firmware write finishes, so the second notification fires at the exact moment the node reboots.
Full Script
You can grab the script from this link. To install it, create a new script, edit it as yaml, and paste in this thing.
ℹ️ Stick the script on a Script Button in Lovelace so you can kick off updates with one tap.
Happy flashing!